Digital thermometer PCB layout
By:PCBBUY 07/14/2021 17:33

Due to the current COVID-19 outbreak, the requirement of digital thermometer has been increasing. There are many PCB manufacturers aiming at the business opportunity. In this passage we will focus on the layout digital thermometer PCB. Please come and check for more information.
How to design digital thermometer PCB?
1. Finalize your Digital Thermometer Circuit Schematics
You may need a digital thermometer for domestic, commercial, or industrial use. If you are designing its circuit schematics for industrial purposes, then you may need high-temperature tolerance. You may use a microcontroller such as ATmega16 MCU to measure temperature as high as 1024°C.
You may also need to use thermocouples for detecting high temperatures in your digital thermometer. The most common thermocouple is k-type. You may already be using it as it is reliable, accurate, and inexpensive. Moreover, you should also use ICs, such as the MAX6675 IC. It has inherited cold-junction compensation and will convert the K-type signal into digital form.
In digital thermometers, cold-junction compensation offsets the missing thermoelectric voltage because the instrument is cold thermocouple end is not (0°C/32°F). The MAX6675 IC will give you digital signals with a precision of 0.25°C. For getting the display, you may use seven-segment screens. For domestic use, you may use thermistors for the digital thermometers.
2. Make a PCB layout of Digital Thermometer.
Okay, so once you have finalized the circuit schematic and made it in your favourite software, you are all set to begin designing the PCB layout of a digital thermometer. The schema serves as a model for trace layout and components placement on the PCB.

Furthermore, the software for PCB design will import all footprints, wires, and parts into a PCB format, making the design process more efficient.
You should ensure that each schematic symbol in a digital thermometer must associate with a PCB footprint. The PCB footprint defines the physical dimensions of parts and positioning of the through-holes or copper pads. After this, you will start routing the wires of your designed digital thermometer. You can choose auto-routing or do it manually.
Once you complete all the routing, the labelling of the parts or symbols is a good idea. The tags will move to the PCB layout and finally get displayed on the completed PCB. Moreover, you may organize components in every portion of the digital thermometer PCB. It will certify that the conduction traces are small. Lengthy traces can accumulate substantial concentrations of electromagnetic radiation that can cause noise and interference.
3. Etch your PCB
You can use a laser printer to take a print out of digital thermometer PCB on A4 glossy or photo paper. You must take the mirror print out to ensure that it is on the bright side of the article. Also, you must select the black colour of output in both PCB design and printer settings.
After that, cut your copper PCB sheet for the digital thermometer. You may use a cutter or a hacksaw according to PCB layout dimensions. Use abrasive sponge scrubs or steel wool to rub the copper on the PCB. It will remove any photoresist and oxide layer present on the PCB. Next, you will transfer the digital thermometer printed layout to the PCB from the glossy paper.
At this point, it is crucial to keep the board and printout in correct alignment. You may use a tape to keep them in the right position. Finally, you will use an iron to transfer the digital thermometer PCB layout printout to the copper sheet. You will place and press the hot iron on the back of the glossy paper for about 5 to 15 minutes. The heat will transfer the ink to the PCB from the glossy paper.
4. Drill Vias Into your PCB Sheet of Digital Thermometer
You may have used vias while designing your digital thermometer PCB. These are paths that allow the electrical signal to move between different circuit layers. Being a beginner or if you are designing PCBs at home, you may be using through-hole vias. If you have designed buried or blind vias, you may need to contact a PCB manufacturer for drilling purposes.
You cannot drill multiple vias at home. PCB manufacturers have specialized automated drilling machines for such purposes. You will notice that there is an option to export a drill file in all PCB layout software. You need to produce that drill file, and it will contain all the holes specifications for final PCB production.
If you wish to do drilling, there is no unique trick. However, you must obey rules for maximum aspect ratio, minimum diameter, and adjacency of holes. You will get maximum aspect ratio dividing PCB thickness by width of the tunnel. And, adjacency is the minimum permissible distance from hole edge to the closest adjacent hole.
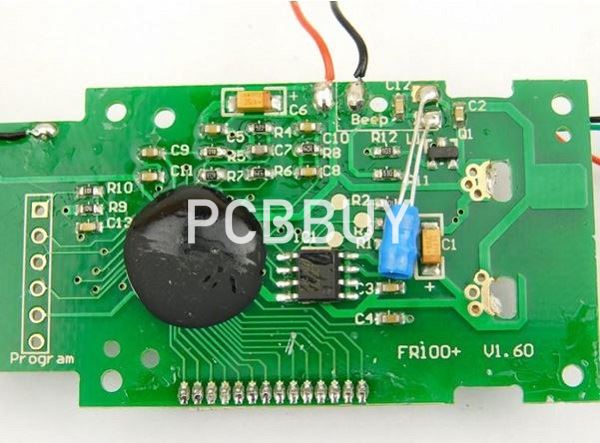
5. Place and Solder the Electronic Components
Well, this stage is quite simple – you will place and solder the parts of the digital thermometer together. You may start with capacitor and resistors, then battery clip and thermistor, and then ICs and displays. If you are using any DIL sockets, remember to place them on digital thermometer PCB in the end.
However, if you are not using DIL sockets, be careful while soldering the ICs. You must wait for the pin to cool down before fastening the next bolt. It is because they are highly heat-sensitive and can damage thin wires in the IC. Moreover, you must not put your solder on the pin for more than 4 seconds. And, then wait for five more seconds before starting soldering the rest of the nails.
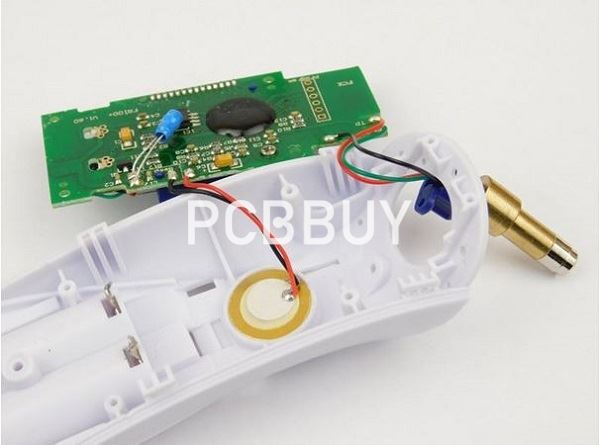
If you are not an expert in using the soldering iron, you can attach wires to thermistor and switches. It is to mount them on the enclosure and avoid soldering. After soldering, you may opt for putting the digital thermometer PCB into a plastic ring. It will give your digital thermometer a more professional look.

6. Test your Final Product
Now that your digital thermometer PCB is ready, it is time to find any defects in the assembly. You can go for functional testing of your PCB. On simulation, you can check that when initially you run the simulation what LED or display lights up. You can place an indicator LED in your circuit just to check your digital thermometer circuit is working correctly.
You can give supply to your PCB and check whether the indicator LED lights up. Further, you can place DMM’s probes between different circuit points to check for any shorts or open circuits. However, these methods are traditional, and you would only use them as a beginner. PCB manufacturers use advanced techniques such as in-circuit tester and bed of nails.
Industry Category


